Merging branches
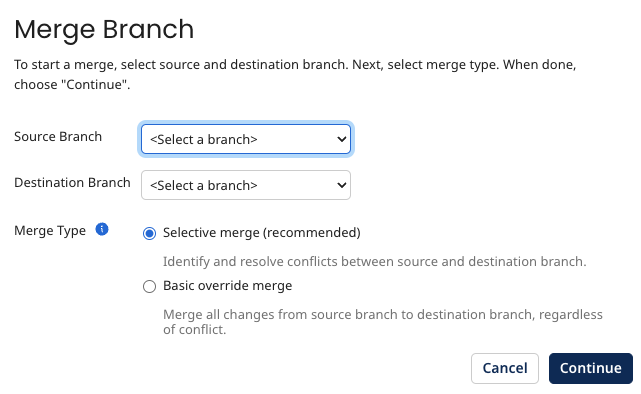
When you have finished working in a branch, you can merge it into another branch from the Build canvas by clicking Merge Branch from the shortcuts sidebar or from Branch Management.
-
Select the source branch that you want to merge.
-
Select the destination branch into which you want to merge the source branch.
-
Choose the merge type:
a. Selective merge - Any conflicts between the source and destination branches must be resolved before the merge can be submitted.
b. Basic override merge - Merges all changes from the source branch to the destination branch regardless of any conflicts.
-
Click Continue.
Selective merge
With a selective merge, you can review your changes and also resolve any conflicts that might be between the source and destination branches. For example, if a map component has been modified in both branches, you can choose which version of the map you want to keep. You can't complete the merge until all conflicts are resolved and no components are locked.
Basic override merge
After selecting a basic override merge, you can review the changes you are about the merge into the destination branch. Conflicts will be indicated, but you can't resolve them manually. The version in the source branch is automatically used to resolve conflicts.
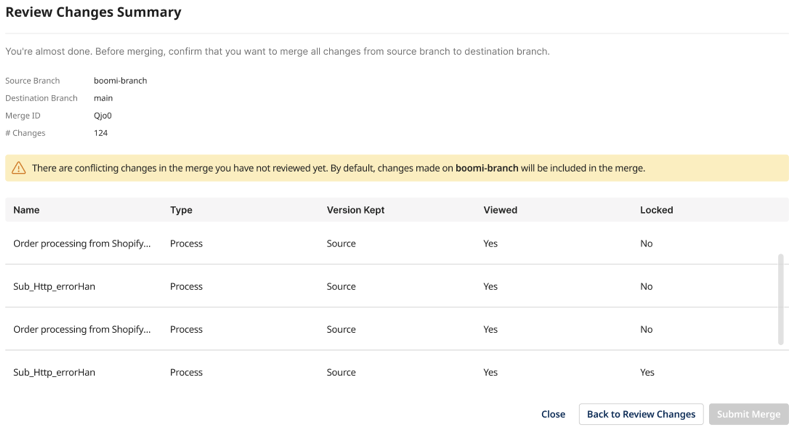
You must review all existing conflicts before you can proceed with the merge. A banner will display on the Review Changes Summary page and the Submit Merge button will be unavailable if there are unreviewed conflicts.
Review your changes
Before you submit the merge for processing, you must review all of the changes. The Select Changes dialog detects and highlights all changes to components between the source and destination branches and you can select which components you want to include in the merge request. If you are performing a selective merge, you can't move on to the next step in the merge flow until conflicts have been resolved.
If there are any locked components, make sure to unlock them in the destination branch before continuing. You can click Refresh Locked in the Select Changes dialog to refresh the components and continue to the merge summary.
Component selection for merges
All components are included in a merge by default, but you can deselect any you want to exclude. If you exclude components flagged as conflicts, they won't need to be resolved or reviewed during the merge process.
Excluding locked components allows you to complete a merge without clearing the lock.
In the Review Changes Summary dialog, you can review all changes one last time before submitting a merge. This page shows the component name, type (such as process, connection, or map), which version is kept (source or destination), whether the components have been reviewed, and if they are locked.

Click Merge Branch to merge your changes into the destination branch. The merge can take anywhere from a few seconds to a few minutes to complete, depending on factors such as the number of components in your account. The branch status in Branch Management shows when a merge is in process.
View open merge requests
You can see open merge requests on a branch in Branch Management by clicking View Merge Requests from the Actions menu.

To return to an open request to finish merging it or if you exited the Merge Request dialog before completing it, you go through the same process as creating one but select the same source and destination branch and the same strategy. For example, if you have an open request between sample-branch and main using Selective Merge that is in REVIEWING status, you can complete the merge by:
-
Open a merge request by clicking Merge Branch from Branch Management or the shortcuts sidebar on the Build page.
-
Select
sample-branchfor the Source branch andmainfor the destination branch. -
Select Selective Merge.
You are returned to the Select Changes dialog and can continue reviewing your changes before completing the merge. If changes are detected to the branches, the merge request will refresh, ensuring the new changes are now part of the merge request.
Cancel a merge in reviewing status
If you need to cancel a merge request that is in reviewing status, you can use the Merge Request object.
-
Get the
merge IDfor the merge request from the Review Changes Summary dialog. -
Use the DELETE operation with the
merge IDto cancel the merge request.
Revert a completed merge request
If you need to undo changes to a branch, you can revert a completed merge request from the platform or by using the Execute operation of the Merge Request object.
Reverting a merge request creates a new revision on the destination branch and reverts all associated changes.
Reverting a merge request is permanent. You cannot undo or roll back a reverted request.
-
From the Branch Management page, click the Actions icon next to the branch for which you want to revert a merge and select View Merge Requests.
The Merge Requests dialog displays.
-
Click the Actions icon next to the merge quest that you want to revert and click Revert.
A confirmation dialog displays.
-
Click Revert to finish the process.
Delete an open merge request
If you have active merge requests that are no longer needed, you can delete them from the platform or by using the Delete operation of the Merge Request object. You can also delete merges that have been stuck in a non-deleting stage for over 15 minutes.
Once you have deleted a merge request, it cannot be restored.
-
From the Branch Management page, click the Actions icon next to the branch for which you want to revert a merge and select View Merge Requests.
The Merge Requests dialog displays.
-
Click the Actions icon next to the merge quest that you want to revert and click Delete.
A confirmation dialog displays.
-
Click Delete to finish the process.
